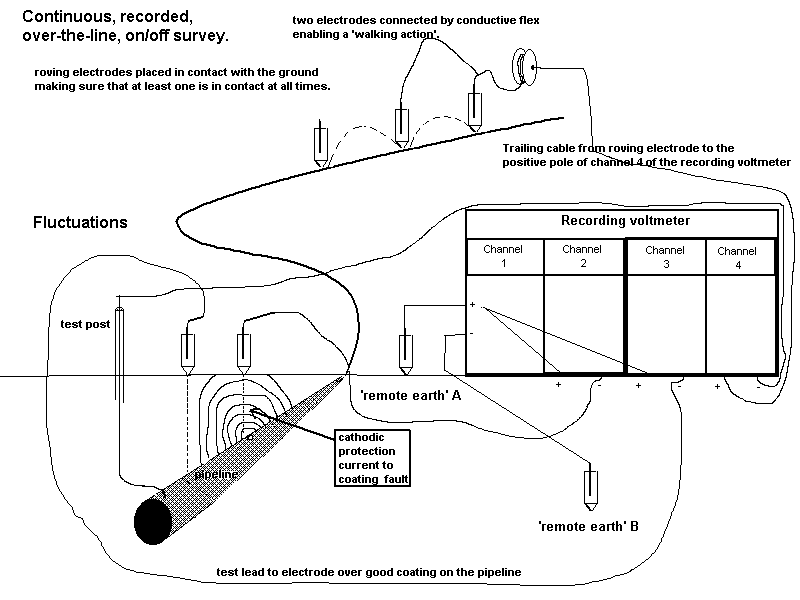
This type of survey provides much useful information as well as removing some of the errors in traditional pipe-to-soil voltage readings.It is conducted in the same way as Procedure 6, except that an arrangement of two roving half-cells on a trailing conductor, allows a continuous trace to be made on a recording voltmeter or data-logging device.
With the CP switching on and off, two graphs are plotted automatically, giving permanent information which is not dependant on the operators noting the readings.
The results can give a very accurate indication of the coating condition of the pipeline and, together with other techniques, can indicate where the pipeline is cathodically protected, and where corrosion is likely to be found.
INSTRUMENTS
- Recording voltmeter.
- High resistance voltmeter.
- 2 Cu/CuSO4 electrodes arranged and connected as per the attached drawing.(walking electrodes)
- 2 Cu/CuSO4 electrodes.
- Reel of trailing conductor and spool.
METHOD
6.1.1. Carry out Procedure 6
6.1.2 Connect the walking electrodes to the trailing conductor on the carrying spool.
6.1.3. Connect the other end of the trailing conductor to the positive terminal of Channel 4 on the recording voltmeter.
6.1.4. Connect the negative pole of Channel 4 of the recording voltmeter to the pipeline test facility.
6.1.5. The timers should be switching the CP current off for a period of 3 seconds and back on for a period of 12 seconds.
6.1.6 Set the chart speed at 1000mm/hr and start recording.
6.2.1. Lift both electrodes clear of the ground for a period of a minute, to leave a clear trace of the start of the survey, and make a note on the chart "Location, start continuous overline survey."
6.2.2. Leave an attendant watching the recorder, and 'walk' the two electrodes, at one meter steps, over the pipeline to the next CP test facility. Each step should take about one second and ground contact must be maintained by either electrode, or downward spikes will appear on the chart trace.
6.2.3. At the next test facility, lift both electrodes clear of the ground for one minute to leave a clear trace on the chart, then place them together on the ground.
6.2.4. Mark the chart with the location, so that the section of the trace can be clearly identified.
6.2.5. Lift both roving half-cells clear of the ground again, mark the chart and survey to the next test facility.
6.2.6. Repeat for the complete length of a section of pipeline between isolation joints.
If there is a risk of the conductor being broken, such as at road crossings, then the chart recorder should be moved to a new, suitable location.
Where this is necessary, then the new remote reference electrode potential should be related to the last remote reference electrode. The chart will bear a trace of the voltage between the old remote reference electrode and the fixed electrode over the pipeline at the beginning of the preceding survey run.
The new position of the remote reference electrode can be established in relation to the last position of the over the pipeline polarized potential survey. It is therefore possible to have a complete section of pipeline with a common reference electrode potential.
The trace will appear as a 'saw tooth', which will undulate along the section surveyed. The on and off readings will normally run parallel, except where passing through the immediate area of influence of the groundbed which is being switched.Any other marked peaks where the on and off readings run parallel, are due to IR influences in the ground, and can indicate interference.
Troughs can indicate coating faults, shielding or interference and their location should be identified and marked on site .
Where the 'off' potential is less than 0.850v (the trace being negative to the top), then investigations should continue at this location.
Each location that is investigated should be identified and have its own file.
When all instrument techniques have been carried out, the indications should be checked by excavation and physical examination of the pipe and coating condition.
The location and work should be photographed, or video recorded to provide training material and allow techniques to be developed further.